Window 的添加过程
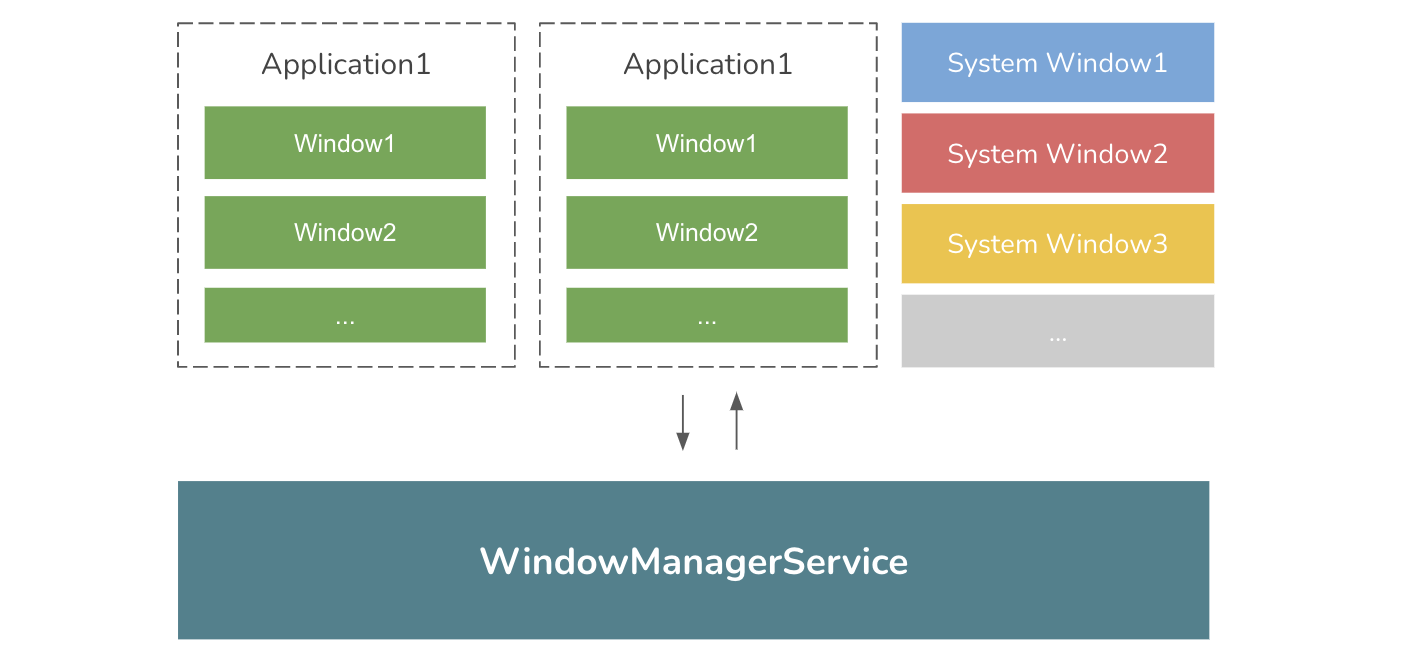
Andorid 系统中,各个大大小小的 Window 都是由系统服务 WindowManagerService 来统一管理的,其中实现了包括窗口的添加、更新、删除等一系列操作。
关于系统服务的概念,可跳转至 Android 系统服务概念理解
基本使用
Window 的实际视图是一个 View,新建一个 View 之后通过 WindowManager 便可完成一个窗口的添加, 添加窗口的代码示例如下:
class MyActivity extends Activity {

    @Override
    protected void onCreate(@Nullable Bundle savedInstanceState) {
        ...
        WindowManager.LayoutParams layoutParam =
            new WindowManager.LayoutParams(
                WindowManager.LayoutParams.MATCH_PARENT,
                WindowManager.LayoutParams.MATCH_PARENT);
        layoutParam.type = WindowManager.LayoutParams.TYPE_APPLICATION_MEDIA;
        View view = new View(this);
        getWindowManager().addView(view, layoutParam);
    }
}
其中,WindowManager.LayoutParams 直接继承于 ViewGroup.LayoutParams,专用于描述窗口根视图 View 的布局属性,在 ViewGroup.LayoutParams 的基础上增加窗口类型、窗口 token 等重要参数。
通过 WindowManager 发起窗口添加
而 WindowManager 真正的实现类为 WindowMangerImpl,其可视为系统服务 WindowMangerService 在当前应用进程的代理实现,在注册系统服务一处中,可找到其出处:
final class SystemServiceRegistry {
    static {
        ...
        registerService(Context.WINDOW_SERVICE, WindowManager.class,
                new CachedServiceFetcher<WindowManager>() {
            @Override
            public WindowManager createService(ContextImpl ctx) {
                return new WindowManagerImpl(ctx.getDisplay());
            }});
    }
}
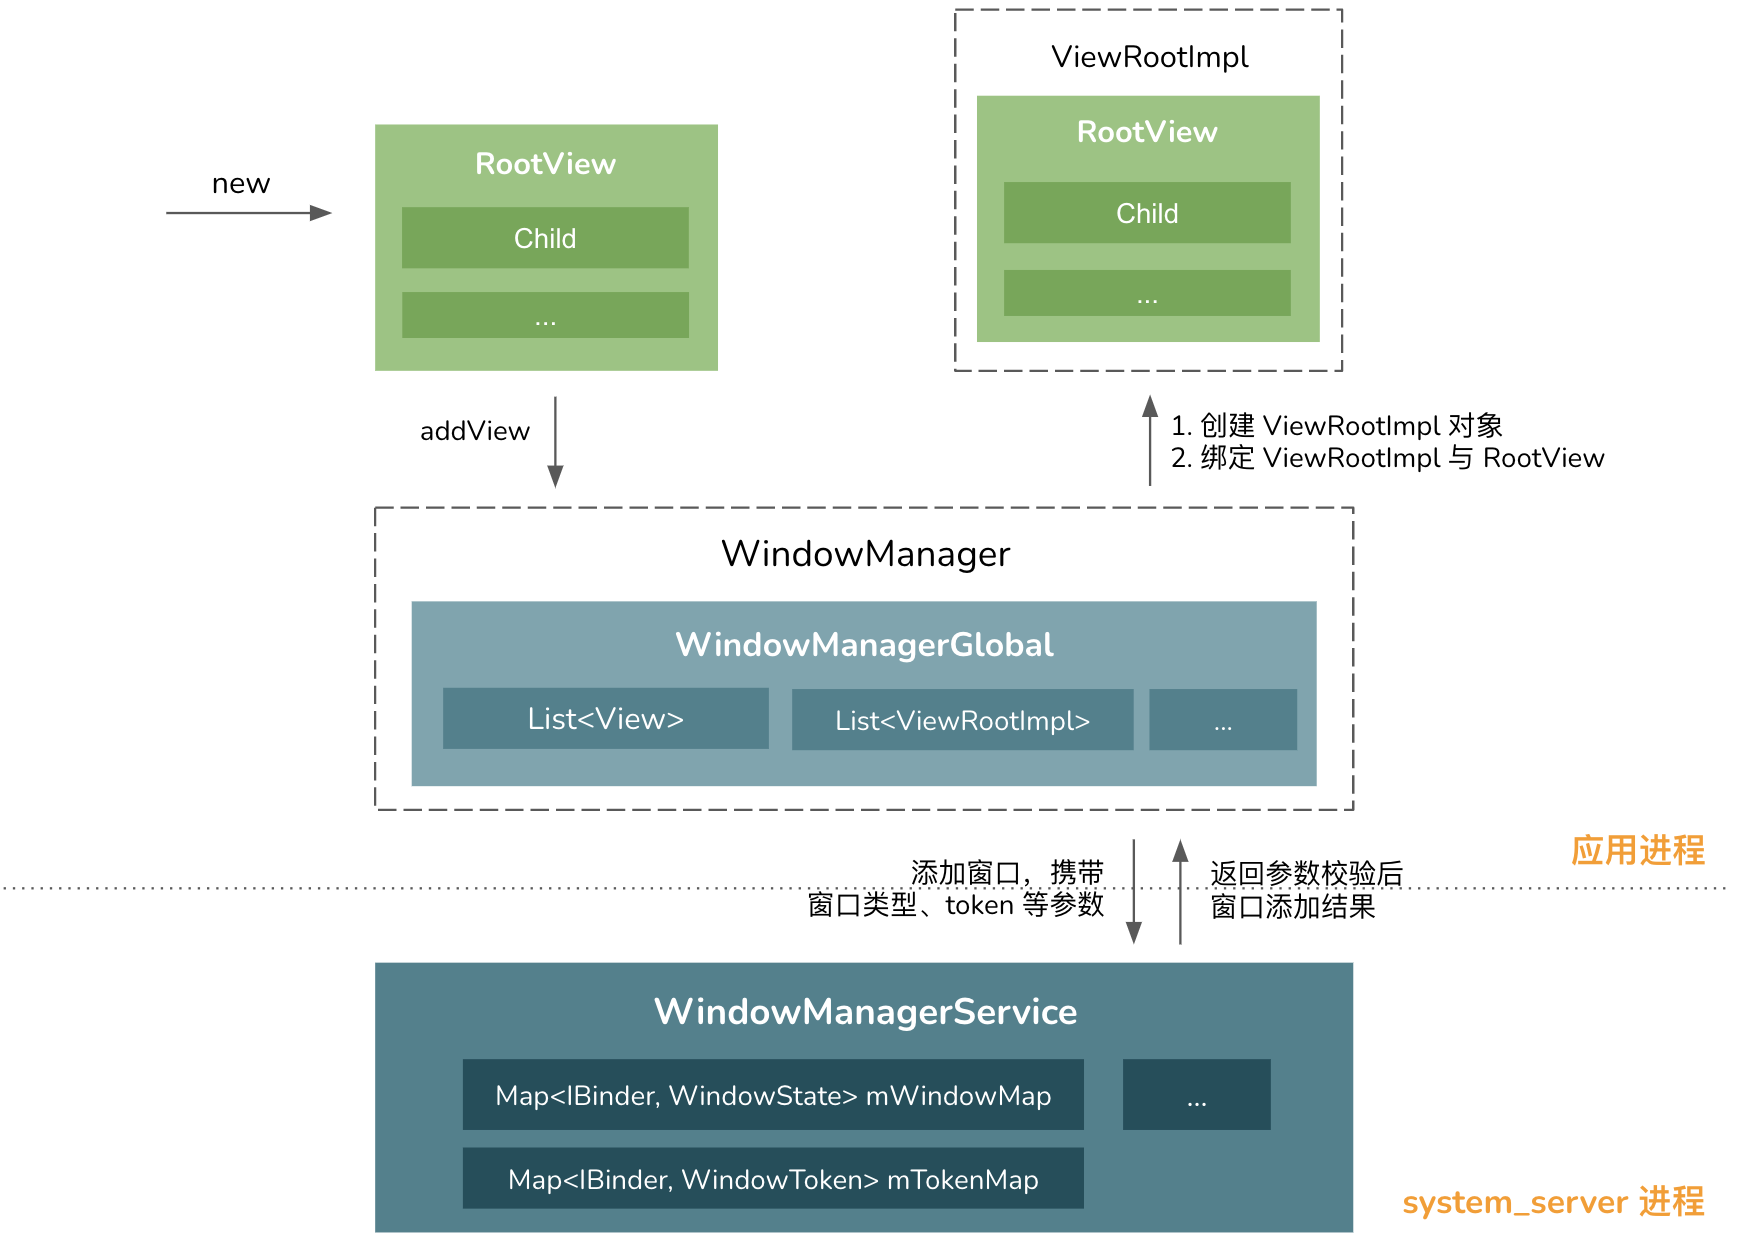
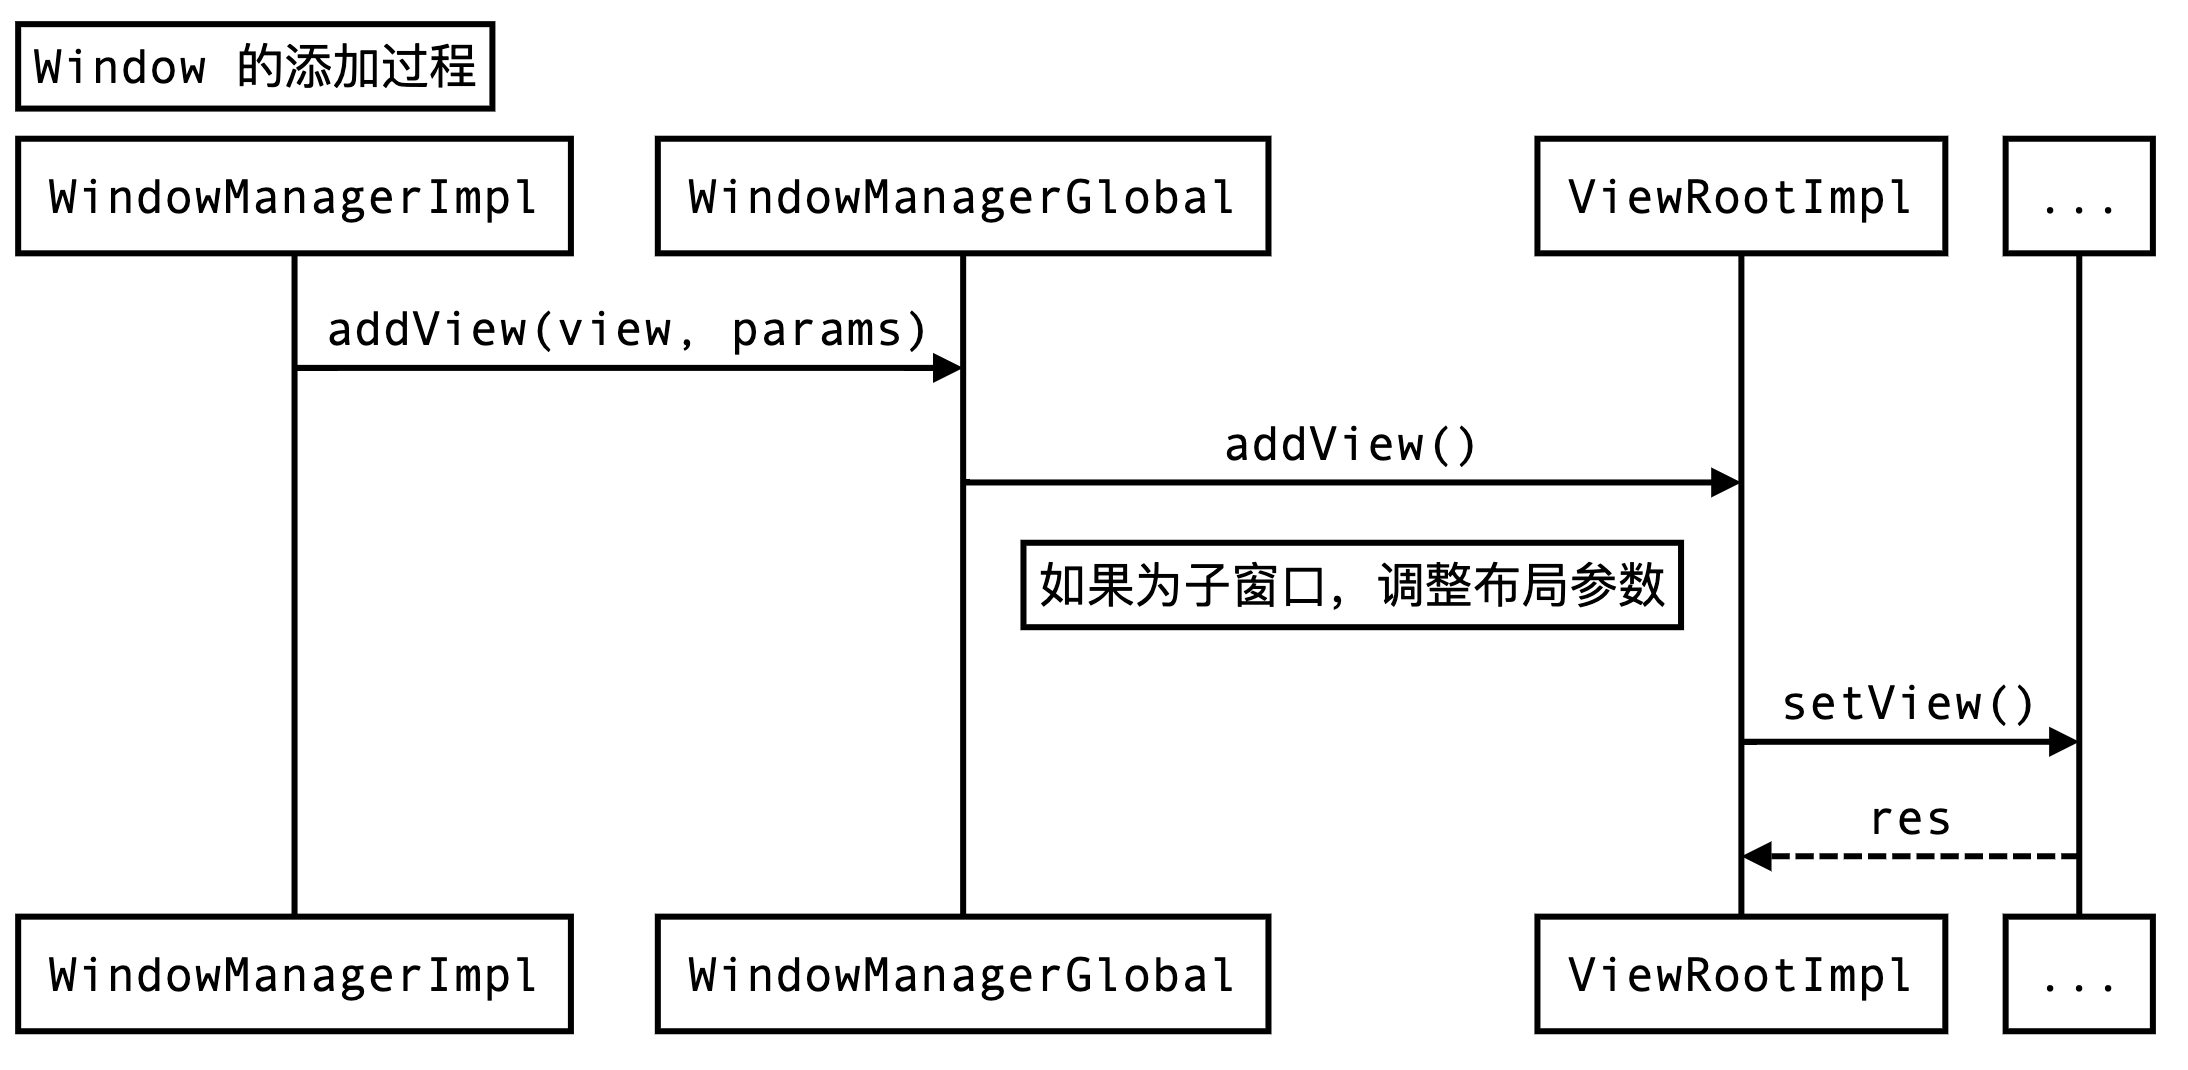
下面进一步分析 WindowMangerImpl 内 Window 的添加过程,整体流程时序图示意如下:
frameworks/base/core/java/android/view
    - ViewRootImpl
    - WindowManager.java
    - WindowManagerImpl.java
    - WindowManagerGlobal.java
-
WindowMangerImpl 在应用进程中是允许创建多个的,实际上每个 Activity 窗口就会新建一个 WindowMangerImpl 对象,与其上下文环境相关。
-
WindowManagerGlobal 和 WindowMangerImpl 都实现了
WindowManager接口。WindowManagerGlobal 为单例实现,其目的是提供不依赖上下文环境的窗口管理实现。
WindowManagerGlobal 的 addView() 方法具体实现如下:
public final class WindowManagerGlobal {
    ...
    public void addView(View view, ViewGroup.LayoutParams params,
            Display display, Window parentWindow) {
        ...
        final WindowManager.LayoutParams wparams = (WindowManager.LayoutParams) params;
        if (parentWindow != null) {
            // 关键点 1:调整子窗口的参数
            parentWindow.adjustLayoutParamsForSubWindow(wparams);
        } ...

        ViewRootImpl root;
        ...
        synchronized (mLock) {
            ...
            // 关键点 2:创建 RootView 的管理实现类 ViewRootImpl 对象
            root = new ViewRootImpl(view.getContext(), display);
            view.setLayoutParams(wparams);
            mViews.add(view);
            mRoots.add(root);
            mParams.add(wparams);
        }

        try {
            root.setView(view, wparams, panelParentView);
        } catch (RuntimeException e) {
            // 窗口添加失败,移除相关
            synchronized (mLock) {
                final int index = findViewLocked(view, false);
                if (index >= 0) {
                    removeViewLocked(index, true);
                }
            }
            throw e;
        }
    }
}
此方法完成了以下几个核心工作:
-
根据父窗口来调整子窗口的参数,其最核心是获取父窗口的
token为子窗口使用; -
创建 RootView 管理实现类 ViewRootImpl 对象,与 RootView 所绑定,窗口添加成功后。保存 RootView 和 ViewRootImpl 等对象。
文章系列 1 提到过:窗口 token 是用来保证窗口安全性的唯一凭证,根据窗口的类型,而窗口 token 的获取方式可大致分为:
| 类型 | token 来源 |
|---|---|
| Activity 应用类型窗口 | 以 Binder IPC 通信中 IBinder 对象为 token |
| 其他应用类型窗口 或 子类型窗口 | 使用父窗口(Activity)的 token |
| 系统类型窗口 | 不需要 token |
通知 WindowManagerService 完成窗口添加
而后,在 ViewRootImpl 内,发起 IPC 调用,把窗口相关参数传递到系统服务 WindowMangerService 中,完成窗口添加的流程,时序图示意如下:

frameworks/base/core/java/android/view
    - ViewRootImpl
    - IWindowManager.aidl
    - IWindowSession.aidl

frameworks/base/services/core/java/com/android/server/wm
    - WindowManagerService.java
    - Session.java
其中,窗口添加和其他大部分的系统服务调用一样,都是通过 Binder 来完成应用进程和系统服务进程之间的跨进程通信。需要注意的是,这里 Binder 通信的接口有两个,除了 WindowManger 和 WindowManagerService 通信外,还额外引入了一个 WindowSession 来辅助完成窗口的增删改等操作。Binder 采用的是 C/S 架构,这里分别对应如下:
| aidl | Binder-Client | Binder-Server |
|---|---|---|
| IWindowManager.aidl | WindowManagerGlobal.sWindowManagerService | WindowManagerService |
| IWindowSession.aidl | WindowManagerGlobal.sWindowSession | Session |
其中,IWindowSession Binder client 端实现是由 IWindowManager.openSession() 方法返回。换言之,窗口的添加,一共进行了两次跨进程通信:
- 和远程 WindowManagerService 通信,获取 IWindowSession$BinderProxy 对象
- 和远程 Session 通信,通知 WindowManagerService 添加窗口并回调结果
而后,在 WindowManagerService 中,完成了窗口参数的检验,核心实现如下:
public class WindowManagerService extends IWindowManager.Stub {

    final HashMap<IBinder, WindowState> mWindowMap = new HashMap<>();
    final HashMap<IBinder, WindowToken> mTokenMap = new HashMap<>();

    public int addWindow(Session session, IWindow client, int seq,
            WindowManager.LayoutParams attrs, int viewVisibility, int displayId, ...) {

        boolean addToken = false;
        WindowToken token = mTokenMap.get(attrs.token);
        ...
        // 添加窗口合法性检验:
        // 1. 窗口是否被重复添加
        // 2. 子窗口的附着窗口是否存在
        // 3. 应用窗口的 token 检验,系统窗口创建新 token
        // 4. 其他类型窗口检验
        ...
        WindowState win = new WindowState(this, session, client, token,
                    attachedWindow, appOp[0], seq, attrs, viewVisibility, displayContent);
        ...
        res = WindowManagerGlobal.ADD_OKAY;
        if (addToken) {
            mTokenMap.put(attrs.token, token);
        }
        win.attach();
        mWindowMap.put(client.asBinder(), win);
        ...
        return res;
    }
}
在完成 Window 参数的校验后,若窗口添加成功,则返回 WindowManagerGlobal.ADD_OKAY。若添加不成功,则返回其他的值,在 ViewRootImpl 处抛出异常。
总结
窗口添加整体流程图如下: